

Mastering Email Merge in NetSuite for Seamless Outreach
NetSuite Email merge is a powerful tool that allows you to send personalized emails to a large group of people at once. It involves combining a pre-written email template with a spreadsheet or database of recipient information, such as names, email addresses, and other relevant details. This way, you can create a single email that looks and feels like it was written specifically for each recipient.
What are the benefits of using email merge?
There are many benefits to using email merge, including:
- Saves time and effort: Email merge can save you a lot of time and effort by automating the process of sending personalized emails, instead of writing and sending individual emails to each recipient.
- Increases engagement: Personalized emails are more likely to be opened and read than generic emails. This is because recipients are more likely to be interested in content that is relevant to them.
- Improves response rates: Personalized emails can also lead to higher response rates. This is because recipients are more likely to take action when they feel like they’ve received a personal message.
Here’s how to do an email merge in NetSuite:
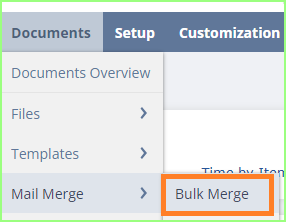
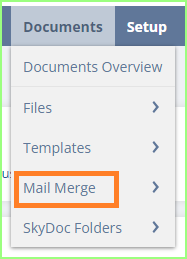
- Open NetSuite Account and look for the tabs at the top of the screen click on the “Documents” tab.
- Choose “Mail Merge” under the “Documents ” and select the “Bulk Merge” option in the list.

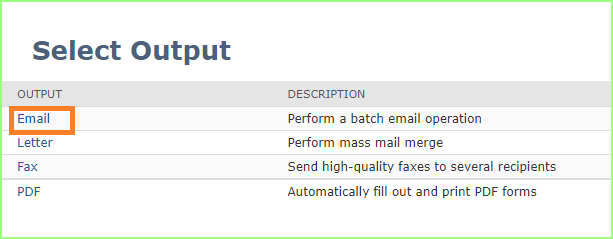
- Look for a page titled “Select Output.” And find the page about choosing output.
- Click on “Email” as shown in the diagram below.
- Look for the “Recipients” tab click on it and select the type of group you want to send emails to (like customers, leads, or employees) from the list labeled “Group Type”.
- Find the exact group you want to email from the list labeled “Group”.
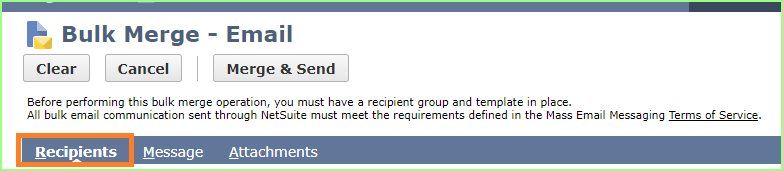

- Enable “Opt-Out Override” to override opt-outs for critical updates or non-marketing emails.
Draft a New Email
- Click on “Message tab” to draft a new email as shown in the diagram below.
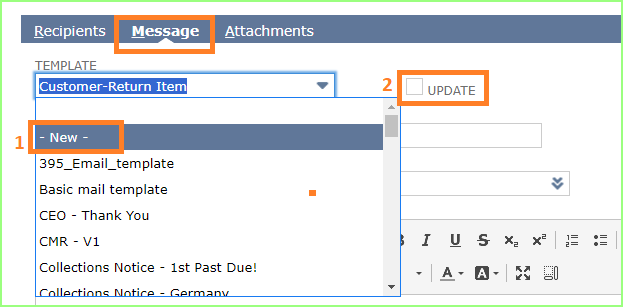
- If you want to start fresh, click on the option that says “-New-“.
- If you edit a template and want to keep those changes, check the box next to “Update.”
- New – To create a new email template.
- Update – If you want to keep those changes to the template file.
Here’s how to add extras to your emails:
- Click on the tab “Attachments.” And check the box next to “Zip Attachments.” If you want to make your attachments smaller.
- If you have a Microsoft Word document you want to include, attach it here as shown in below diagram.
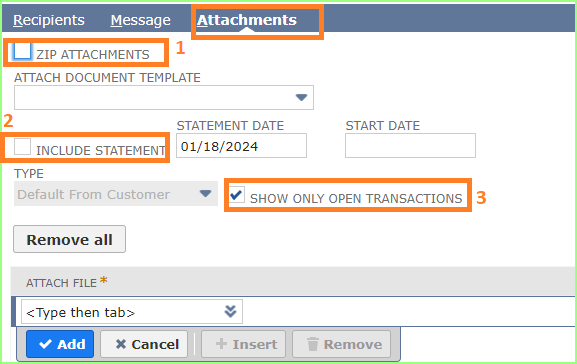
- If you’re sending customer statements, check the box next to “Include Statement” and fill in the “Statement Date” and “Start Date”.

- Choose the kind of statement you want to include from the list of Types.
- If you only want to show transactions. Check the box next to “Show Only Open Transactions.”.
- Attach any other files you want to include (keeping in mind the 5 MB limit) in the column “Attach File”.
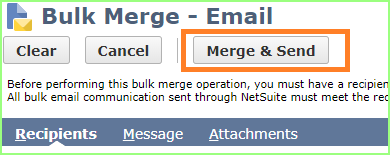
Final Step
- Find the “Merge & Send” button and click on it. NetSuite will take care of Merge & send those emails for you!
Comments